Showing posts with label baking. Show all posts

Friday, 22 November 2013

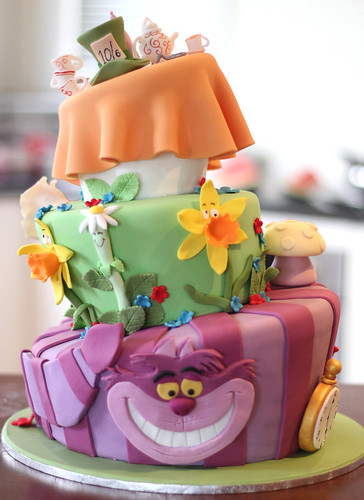
Alice in Wonderland Unbirthday Cake

I recently shared my eldest nieces Halloween themed birthday cake but I've not shared the one we made back in August for my other nieces birthday. When we first started making cakes for my nieces, we'd pick something they liked, like a favourite disney or cartoon character and it was pretty straightforward. I think what has now happened is that my sister leaves my nieces in front of google image search for a bit, and they look for the most difficult cake for us to replicate to see how far they can push us before we break. I never thought we'd be able to pull off the Alice in Wonderland cake for my youngest niece, especially as Ian was unable to help because he had lots of work to do. 

It was also tricky because we were attempting our very first topsy turvy cake. After much studying of you tube videos, I was confident I had an idea of the technique needed (you can get topsy turvy cake pans but we're always a bit last minute with these things!). Some careful carving and moulding of cake later, and we had the cake all covered (including a cheshire cat stripey bottom layer). 

Here's the finished cake in all it's topsy turvy glory. 


IMG_8397


Again, the detail really made the cake - it's all there - the cheshire cats face (Ian took a break from his work to help with this one)...

IMG_8357

...the tea set (non matching as I'd imagine all mad hatters tea sets are) along with the mad hatters hat itself....


IMG_8393

...some playing card people (which we might have used non edible pen on because we only had a black icing pen - I don't think they were eaten but I'm sure it wouldn't have killed anyone if they were)

IMG_8366

I'm really proud of my daffodil - the centre was really tricky to make and attach but I think it's clear what it's meant to be.

IMG_8361

The daisy looks really happy to be part of the cake (and so it should!)


IMG_8362

The eat me label on the entire cake was my favourite part (and one of the only things not on the cake picture we were working from).

IMG_8359

Alice in Wonderland clearly isn't my nieces favourite movie as she was confused by the 'unbirthday' tag (this confirms my suspicion that she was just trying to test our cake skills!).

IMG_8358


Friday, 1 November 2013

Halloween Birthday Cake

My niece was born very close to halloween. Consequently every birthday cake we make for her these days is halloween themed. This year we took inspiration from this cake here but she's now old enough to know what she likes so she made her own tweaks to the cake. Because we were working towards not just a picture, but her description of what she wanted, it was a bit daunting as we had to hope we'd understood the brief correctly.

IMG_9180


She seemed pretty pleased with it - I wasn't there when she cut into it to reveal the colourful insides but I'm happy with how it turned out. 


601090_10152310434298222_231774700_n


Ian did a great job making all the skulls (he did get a bit bored because he had to make 8 of them all the same and that's not really his thing) - check out this close up of one.

IMG_9170


The pumpkins were slightly more fun because we could give them each a personality of their own. I got to arrange them on the cake so of course my favourite ended up at the front.

IMG_9180


He looks so shocked to be there - it makes me giggle. As does the goofy one.

102_3210


But look at this poor one. I don't think he wanted to join the party!

102_3209


It's definitely the little details that makes the cakes fun, and I think my nieces enjoy looking for them when the cake arrives. It turns a nice simple cake into something special. (Simple cake as it was, it still required 3 shopping trips and over a day of work!)

Thursday, 17 May 2012

There's Nothing More Fun Than A Cake Challenge

IMG_2558

Ian may not agree with the fun part, but we'll ignore that because he's stuck with me forever and he'll just have to deal with it!

It was our second meeting of our Clandestine Cake Club last night, and the theme was 'Jubilant Jubilee'. I couldn't decide whether to go for something decadent and fit for a queen, or something that looked impressive. I like a good challenge so I decided to go down the impressive looking cake route.

I was inspired by the humble battenberg cake, and was really excited by the idea of having a cake where every slice was a union jack flag. All my friends thought it was a challenge too far (and it nearly was).

I made two tray bake sponges, using a standard mix (the blue 4 eggs, the red only 2). I tried to find dark blue colouring to try and get a truer match to the flag, but I already had the darkest one my shop offered, so I mixed in a tiny bit of black to try and darken it.
IMG_2534
You'll see that when you bake a blue cake, instead of going golden, it goes green! 
IMG_2536
I tried to cut each length of blue cake into two, on the diagonal, which is not an easy task at all, and was one of the trickiest parts of the cake creation.
IMG_2537
Once you cut into the cake, you realise just how blue it is - the green on the outside definitely fools you.
IMG_2538
I measured up a bit of red cake to sandwich between the two bits of blue cake that I'd just cut, and was going to join all the bits with buttercream, but this was a fragile job, as every time I tried to spread the buttercream, it tried to pull the cake into bits.
IMG_2539
The only way to get it to work was to use my hands, which was a bit weird, and involved a lot of hand washing because buttercream is pretty greasy stuff!
IMG_2540
With all four corners of the cake made, it was time for bed, so it all got cling filmed at put in the fridge to harden the buttercream (yes, there's only three bits in this picture but trust me, I did make four!).
IMG_2549
Making the cross to go in the middle of the union jack involved a lot of joining of cakes, and it definitely turned a bit jigsaw puzzley, but I was running out of time before cake club, and was a bit panicked so had to hope it would work.
IMG_2550
Here's the cake all stacked and assembled - all it needed now was a nice fondant icing blanket to hide some of the joins. 
IMG_2554
I cut off a small amount from both ends to give it a clean finish.

The cake was a lot larger than I was expecting it to be, but I achieved my goal of a flag in every slice (even if each slice had to be shared between two people because of the size!). 
IMG_2557
I've got ideas for improvement of the process but I'm not sure I'll have much call to make another one!
IMG_2559


Tuesday, 1 May 2012

Pinterest is a Dangerous Thing

I waste a lot of time on pinterest - but it's a great way of bookmarking for me - I can see why I pinned things instantly and I don't have to open lots of bookmarks to find the one I'm looking for. 

I saw this clever way of storing cupcake cases on pinterest and have been wanting to do the same ever since. I saw some similar glass jars on amazon and was trying to work out which size to buy - I asked Ian for his opinion and he asked where I planned on putting this jar. I figured it'd look pretty just on the side but he didn't seem pleased.

So, I decided to do it anyway! But on a trial basis for starters. I've not spent any money on a jar (I found this one in a cupboard - although I don't think it's big enough).  And I'm going to sneak it into the kitchen (although Ian now reads my blog so he might  realise I've done it!).

IMG_2522


Do you think it's pretty? Would you allow it to take up some of your kitchen real estate?


Sunday, 29 April 2012

This time last year....

P4290021

I'd been up for hours making food ready for our Royal Wedding tea party.  I'd been struggling to make trays of uniform looking sandwiches (the bread wasn't square!).  I'd made shortbread myself for the first time, but I'd cheated and bought the scones. I'd made two types of sausage rolls (one with onion, one without).

2011-04-28 22.50.10


I'd spent the evening before making last minute bunting as all our local shops were out - it was simple but effective and added a nice splash of colour to the room. 

2011-04-28 22.50.03


I'd also made little union flags to adorn the cupcakes to make up for not piping the icing in a pretty manner (time was too short and I'd run out of disposal icing bags).

2011-04-27 20.38.12


I'd not made enough flags so used skittles to decorate the remaining cupcakes. I'd also realised that my cupcake holder was too big, as there was only 6 people coming to the tea party yet we had 23 cupcakes!
P4290017


I'd roped Ian in to help chop fruit for the Pimm's.
P4290022

We had a nice afternoon in front of the telly watching it all, and even though my friends aren't really very royalist, we enjoyed the day because it was an excuse to get together and drink Pimms!


Wednesday, 25 April 2012

Golden syrup cake

Considering the amount of golden syrup that went into this cake, it couldn't have turned out bad. But it turned out so much better than I was expecting.

You start out by combining the golden syrup, butter, and sugar over a low heat in a saucepan. It looked like a lot of sugary goodness, and after I'd put it all in the pan it seemed like I'd underestimated the size but there was no going back now because it would take an age to get all the golden syrup back out!

IMG_2500
Because the size of the pan, it was pretty hard to mix all the flour in, and I was a bit skeptical with the 300ml of milk the recipe called for because it was already pretty runny, but I trusted that it was correct and ploughed ahead. It doesn't look very appetizing at this stage, but stick with it.

IMG_2502
It was nice and easy to transfer to the tin, and I didn't need to spread it out at all because of the consistency of it.  You'll notice that I didn't manage to get all the lumps out because the saucepan was just too full, but this didn't seem to matter.

IMG_2504
After I took it out of the oven, I drizzled more golden syrup over the top. I was a bit stingy with this, because I knew how much golden syrup had already gone into the cake, but the effect of the drizzling is totally worth it, so go a little crazy!

IMG_2507
The cake  was really moist, and went down well with everyone at work and I'd definitely make it again. I'd imagine it would be good with custard or ice cream when hot too.

IMG_2510


Saturday, 31 March 2012

Mini Baked Cheesecakes

My friend likes cupcakes. My friend likes cheesecake. For her birthday, I thought I'd combine the two. I found this recipe and set about making them. 

I lined the cupcake tray with my good sturdy cupcake cases (seriously, these cupcake cases hold their own, they're not flimsy like the ones you get from the supermarket - I love them!) and then whizzed up the white chocolate cookies into crumbs and squished them into the cases. 

P6280002
I wanted to make sure that I put the same amount of raspberries in each, so I added one to every cupcake.

P6280003
Then I added a second one. They look like they have eyes!

P6280004

And a third

P6280005

And finally a fourth. 

P6280006
Then I poured on the cheesecake mix and popped them in the oven to bake. 

P6280007
Ta da! Mini baked cheesecakes!

P6290009
They were pretty good, they don't look quite as good as in the picture and the bases stuck to the liners a bit. Also, because there was so much grease leakage, the colour started to run off the cake cases (I still love them, but I'd probably use plain white ones if making these again to avoid this).

Wednesday, 28 March 2012

Chocolate Orange Souffles

Remember the mint chocolate souffles? They were good.

But the chocolate orange ones... they were totally better! If you look at the pictures, you'd probably think the previous ones were better, because they're puffed up better, and I'd agree, aesthetically, they rock way more. The chocolate orange ones were really tasty though. I used this recipe here, and what I liked about it is that it only requires cocoa powder, which I have in the cupboard, so I could probably knock up some souffles without planning (not the orange type obviously because we very rarely buy oranges).

IMG_1387

The recipe says it serves two, but as you can see, I made more than two with the mixture, so maybe I have tiny ramekins or something. This was made as part of the wedding vow baking - and I did it in October. I am seriously behind in the baking - thankfully I'm still considered by Ian to be a good wife, but I don't want to push my luck.

Sunday, 29 January 2012

Birthday Party of Awesome

Two years ago I got snowed in on my birthday. I didn't see anyone but Ian, I had a cake that I'd made for my colleagues at work that I had to eat all by myself and it was pretty pants. So, I made a promise to myself that I'd do something to celebrate my birthday so that it felt special. Last year we had a great nacho party. This year an idea came to me whilst watching Ian coming down the stairs for work one day. He was wearing some nice rainbow striped socks and it reminded me how much I like rainbows. If we'd had a massive wedding, I would have had 14 bridesmaids, two of every colour. So, a rainbow themed party it was.

I spent ages looking for inspiration, I even put together a whole rainbow party board on pinterest.  I had a lot of plans but I'm not great at actually getting as far as executing. I still think I pulled off an impressive spread but I could probably have done some more awesome rainbow stuff if I'd spent less time on the internet!

The first task I had to tackle was the rainbow jelly. It needed to set so I started this one in advance. The first two colours were hard work because we don't have blue jelly in the UK and the blackcurrant jelly was not as purple as I'd wanted. Consequently we used soft drinks and gelatine to make these layers. We wanted the jelly to be slightly more exciting than just clear layers (when I say we, I mean me - Ian just got dragged into helping) and so we split each colour in half and added milk to one half to make it more opaque.  It turned out pretty good, there were two different methods of eating it within our group, some ate each layer individually, some attempted to get a spoonful with all the layers - all ate the jelly (apart from one person who doesn't like jelly who had a pretty decent stab so I'm pleased still).


IMG_2093

The next task was to make the centrepiece cake. I was inspired by this cake, and I followed the recipe for the icing, but made the sponges with my normal basic sponge recipe (although I did leave out the egg yolks so as to get a whiter starting mix - not sure that was strictly necessary because the food colour paste I used was pretty bright so could probably have taken the yellow - guess I'll never know as I've no plans to make another one!).  The icing was delicious but was quite hard work to make, mainly due to the fact that I wanted to do the pasteurising mentioned in this post so that my pregnant friend could also enjoy the cake.

IMG_2124


Most of my friends knew what was coming with this cake, but the white icing allows you to hide the rainbow inside the cake until it's served which adds extra wow factor. I'd recommend cleaning the knife between slices to avoid getting coloured crumbs in the icing of the next slice.

The morning of the party, I was making more sweet rainbow delights, this time in the form of marshmallow rice krispie treats. These stuck to anything and everything, but eventually I saw the part in the recipe about spreading them out with a buttered spatula and everything became easier!

IMG_2061
IMG_2091

I wanted to make sure that not everything on the table was for the sweet tooth so I made a rice salad to balance out all the sugar. My plans were to dye a small amount of rice blue to add into the salad, but we ran out of time. It was still quite colourful though with the addition of red pepper, sweetcorn, peas and small cubes of ham.

IMG_2092

I also made a nice tower of rainbow crudites, which allowed me to use another of my many cake stands (after wanting one for several years, I ended up with three as wedding gifts and two more this christmas - I'm not complaining, but I think Ian might be!). I was proud to get natural blue onto my tower too in the form of blue tortilla chips and I felt very pretentious serving up dip that we'd bought from a local restaurant too!

IMG_2087

For those after the healthy option, we also had rainbow fruit kebabs, on another cake stand. We made about 10 of these, so we only needed 10 pieces of each fruit, but we weren't thinking when we went shopping and so bought masses and masses of fruit! Ooops!

IMG_2089

I really impressed myself with the colourfulness of the table and I think this party will be well remembered for quite some time. If you want to see more rainbow party pictures, check out my set on flickr.

IMG_2094